DIY Efforts - Main Bedroom
Although the main bedroom is done with decorating-wise it doesn't really feel like it. I think that's only because I haven't finished putting the doors back on my unit... mainly because they're a pain in the proverbial. I've also got a pile of random junk from when I was sleeping in the guest room before my furniture arrived... I now know the perils of leaving stuff until the last minute as I basically picked stuff up and moved it all to my room.
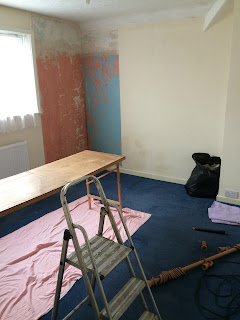


Before
All the rooms upstairs were lined with paper, and unfortunately a lot had to be replaced in this room. When Bristol had a lot of flooding years back lots of the homes had bad roof damage which obviously led to some damage on the walls, luckily that was generally cosmetic. As you can see in the picture we had the paste table up and... I wont use the royal "we" here, Dad replaced the bad paper. He's no Granddad when it comes to decorating but it is all still vaguely on the walls... and now it's stuck down with paint anyway! [Of course, I wasn't expecting him to be as good as my Granddad, there's a reason he was a royal decorator, when he wallpapered you needed a chisel to get the stuff off the walls... or perhaps a flame thrower.]
During
When I was choosing colour schemes upstairs I didn't really know what to go with. The guest room was always going to be shades of brown, and in the end I decided to go with browns and purple. [You will notice there isn't much purple, that's because I couldn't find a nice purple bed set on short notice.] For my bedroom I wanted to go with teal and grey as I have two beautiful duvet sets that I love, one of each colour.
So I set to looking for dark grey curtains... and failed miserably. Because I wanted blackout curtains I had really limited myself, especially as I wanted to buy through Amazon. It wasn't just that I was looking for blackout blinds, grey curtains seem to be something of a golden goose when it comes to décor. I couldn't find any that matched what I was looking for at all, there were silver ones everywhere but they all looked a bit like tin foil. So in the end I went for lighter brown ones than I'd picked for the guest room. [Mink as opposed to chocolate... mmm chocolate.] The walls I painted with the same toasted almond colour and I'm probably just going to accessories in blues.


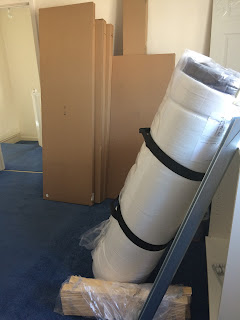
The two pictures above are my Ikea delivery... One shrunk mattress, two packs of bed slats, 1 bed beam and then [I think it was] 7 boxes which contained two wardrobes and a bed. You've already seen the wardrobe for the spare room in the last post, that and the bed that moved here with me are both Ikea and were both easy to put together... although I could have done with extra space when I put the wardrobe together.
Now... friends... Romans... DIYers... lend me your ears. Note the above three door wardrobe... this is the longest Ikea manual [possibly longest manual] I have ever had. It was ridiculous! It's lovely, but pick something else, it really wasn't worth the hassle. If you do buy it, then make sure you have two people because it nearly killed me. If you are as stupid as me and decide to put it together on your own then here's an Emma handy hint... use one of the longer bits of cardboard from the packaging to lay underneath the wardrobe when you put it together. This way, when you need to flip it over it moves easily rather than getting caught in the carpet. Yet again I discovered that the floor is not flat, this one is a bit trickier to fix... but my solution is to find something of the exact size and wedge it down the right hand side of the wardrobe and the small bit of wall... "botch it" is something I have become familiar with!
Result


Not the best of finished photos, I may do a montage of finished ones at the end. It mainly had to be this shot as the right hand side [that's cut off] is basically a pile of boxes and "dead" vacuum pack bags from when I unpacked my clothes.
I've just realised that I didn't tell you about the Ikea bed... as pictured above and modelled by my Harrods bear. I understand that it probably needs more bolts as it's wood and my other bed is metal... but that does not explain why under the slats it needs metal struts that go from the middle of the top and bottom of the bed to the sides. You could just think that this is is for extra strength and support, and I thought that too but they are made of such flimsy metal that this couldn't possibly be the reason.
Also, just a note Ikea, the screws at the top by the headboard... you remember them don't you? Tiny screws that really need one of those tiny screwdriver sets you get at Christmas? Have you actually tried to put this bed together yourself? Do you have a tiny set of Borrowers that screw in these screws? It is next to impossible to do it because of where the headboard is in relation to what the strut has to be screwed to. Another handy hint for those of you getting the same bed... the only angle to screw these two struts in is 45 degrees... and you basically have to force it. But as I said, I can't see that they actually are of any benefit... if the slats fall off the side while you're laying on it... you're going through to the floor too.
Best investment I made for this room? The memory foam mattress, unfortunately my first night sleeping on it I had a horrible cold so didn't sleep well at all, but last night I managed to enjoy it. It's like I'm laying on a marshmallow... actually that's not a good thought to put in my head, I'll probably wake up in the night trying to take a bite of the giant slab of marshmallow I've been dreaming about.


Comments
Post a Comment